How to Deploy a Highly Available MySQL 8.4 LTS InnoDB Cluster on 3 Ubuntu 24.04 VPS with Group Replication, MySQL Router, and TLS (2025 Tutorial)
Introduction
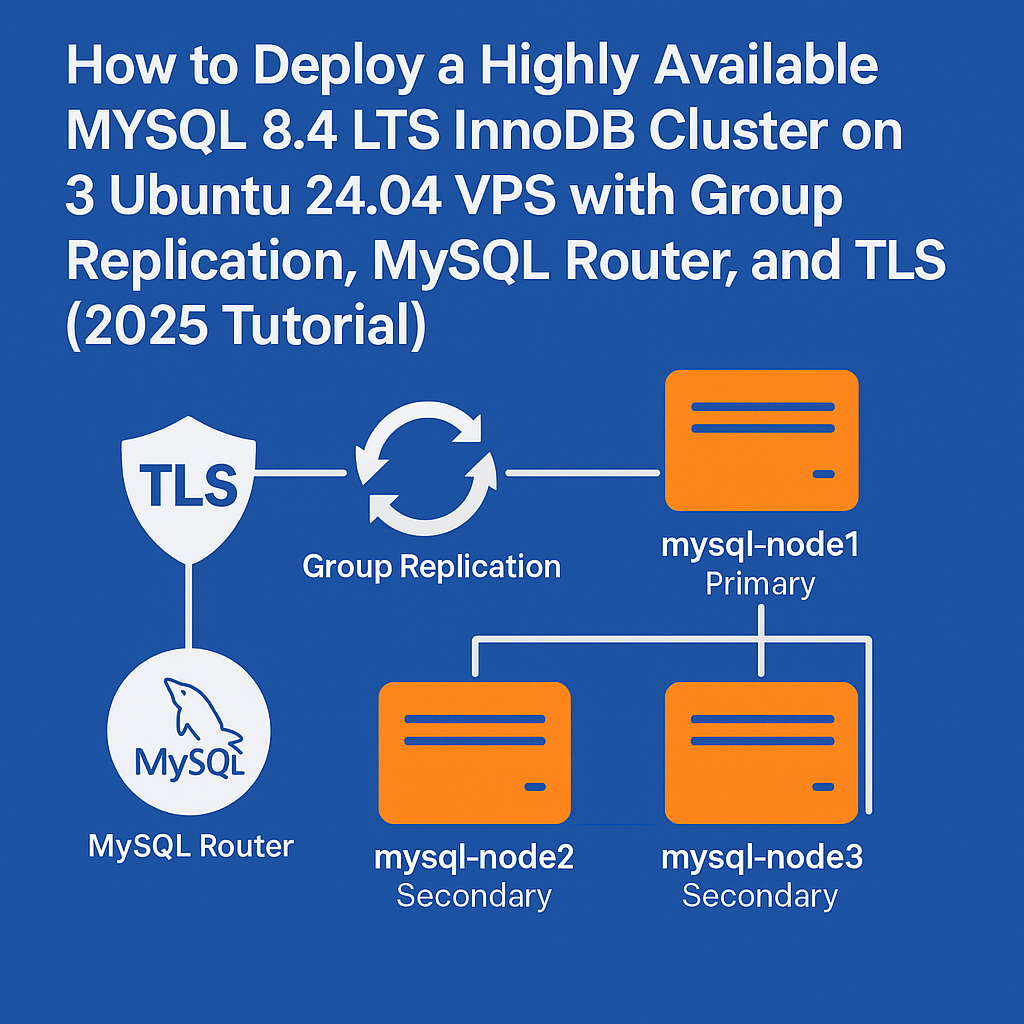
Database high availability is crucial for modern applications, and MySQL 8.4 LTS provides robust solutions through InnoDB Cluster with Group Replication. This architecture ensures automatic failover, data consistency, and zero-downtime maintenance windows.
In this comprehensive guide, we’ll deploy a production-ready MySQL 8.4 LTS InnoDB Cluster across three Singapore VPS instances, complete with TLS encryption, automatic failover, and MySQL Router for intelligent connection routing. You’ll learn to configure MySQL Group Replication, secure inter-node communication, and implement load balancing for optimal performance.
Prerequisites
Before starting this tutorial, ensure you have:
- Three Ubuntu 24.04 LTS VPS instances with minimum 2GB RAM and 20GB storage each
- Root or sudo access on all three servers
- Network connectivity between all nodes (private networking recommended)
- Basic knowledge of MySQL administration and Linux command line
- Firewall ports: 3306 (MySQL), 33061 (Group Replication), 6446/6447 (MySQL Router)
We’ll use the following server configuration:
- mysql-node1: 10.0.1.10 (Primary)
- mysql-node2: 10.0.1.11 (Secondary)
- mysql-node3: 10.0.1.12 (Secondary)
Step-by-Step Tutorial
Step 1: Install MySQL 8.4 LTS on All Nodes
First, update your system and install MySQL 8.4 LTS on all three nodes:
# Update system packages
sudo apt update && sudo apt upgrade -y

# Download MySQL APT repository
wget https://dev.mysql.com/get/mysql-apt-config_0.8.29-1_all.deb
sudo dpkg -i mysql-apt-config_0.8.29-1_all.deb

# Select MySQL 8.4 LTS during configuration
sudo apt update
sudo apt install mysql-server mysql-shell -y

# Secure MySQL installation
sudo mysql_secure_installation
Step 2: Configure MySQL for Group Replication
Create the MySQL configuration file on each node. Replace the server_id and bind-address accordingly:
# Create MySQL configuration
sudo tee /etc/mysql/mysql.conf.d/group_replication.cnf << 'EOF'
[mysqld]
# Server identification server_id = 1 # Use 2 for node2, 3 for node3 bind-address = 10.0.1.10 # Change per node # Group Replication settings gtid_mode = ON enforce_gtid_consistency = ON binlog_format = ROW log_bin = mysql-bin log_slave_updates = ON binlog_checksum = NONE # Group Replication specific loose-group_replication_group_name = “aaaaaaaa-aaaa-aaaa-aaaa-aaaaaaaaaaaa” loose-group_replication_start_on_boot = OFF loose-group_replication_local_address = “10.0.1.10:33061” # Change per node loose-group_replication_group_seeds = “10.0.1.10:33061,10.0.1.11:33061,10.0.1.12:33061” loose-group_replication_bootstrap_group = OFF # SSL/TLS Configuration loose-group_replication_ssl_mode = REQUIRED loose-group_replication_recovery_use_ssl = ON EOF # Restart MySQL sudo systemctl restart mysql
Step 3: Create Replication User and TLS Certificates
On the primary node (mysql-node1), create the replication user:
-- Connect to MySQL
mysql -u root -p

-- Create replication user
CREATE USER 'repl_user'@'%' IDENTIFIED BY 'StrongPassword123!';
GRANT REPLICATION SLAVE ON *.* TO 'repl_user'@'%';
GRANT CONNECTION_ADMIN ON *.* TO 'repl_user'@'%';
GRANT BACKUP_ADMIN ON *.* TO 'repl_user'@'%';
GRANT GROUP_REPLICATION_STREAM ON *.* TO 'repl_user'@'%';
FLUSH PRIVILEGES;

-- Configure recovery channel
CHANGE REPLICATION SOURCE TO SOURCE_USER='repl_user', SOURCE_PASSWORD='StrongPassword123!' FOR CHANNEL 'group_replication_recovery';
Generate TLS certificates for secure communication:
# Create certificate directory
sudo mkdir -p /etc/mysql/certs
cd /etc/mysql/certs

# Generate CA private key
sudo openssl genrsa -out ca-key.pem 4096
# Generate CA certificate
sudo openssl req -new -x509 -days 365 -key ca-key.pem -out ca.pem -subj "/C=US/ST=CA/L=SF/O=MySQL/CN=MySQL_CA"

# Generate server private key and certificate for each node
sudo openssl genrsa -out server-key.pem 4096
sudo openssl req -new -key server-key.pem -out server-req.pem -subj "/C=US/ST=CA/L=SF/O=MySQL/CN=mysql-node1"
sudo openssl x509 -req -in server-req.pem -CA ca.pem -CAkey ca-key.pem -out server-cert.pem -days 365 -CAcreateserial

# Set appropriate permissions
sudo chown mysql:mysql /etc/mysql/certs/*
sudo chmod 600 /etc/mysql/certs/*-key.pem
Step 4: Initialize Group Replication
On the primary node, bootstrap the group:
-- Connect to MySQL
mysql -u root -p

-- Install Group Replication plugin
INSTALL PLUGIN group_replication SONAME 'group_replication.so';

-- Bootstrap the group
SET GLOBAL group_replication_bootstrap_group=ON;
START GROUP_REPLICATION;
SET GLOBAL group_replication_bootstrap_group=OFF;

-- Verify group status
SELECT * FROM performance_schema.replication_group_members;
On the secondary nodes (mysql-node2 and mysql-node3), join the group:
-- Create replication user and configure recovery
CREATE USER 'repl_user'@'%' IDENTIFIED BY 'StrongPassword123!';
GRANT REPLICATION SLAVE ON *.* TO 'repl_user'@'%';
GRANT CONNECTION_ADMIN ON *.* TO 'repl_user'@'%';
GRANT BACKUP_ADMIN ON *.* TO 'repl_user'@'%';
GRANT GROUP_REPLICATION_STREAM ON *.* TO 'repl_user'@'%';
FLUSH PRIVILEGES;

CHANGE REPLICATION SOURCE TO SOURCE_USER='repl_user', SOURCE_PASSWORD='StrongPassword123!' FOR CHANNEL 'group_replication_recovery';

-- Install plugin and start Group Replication
INSTALL PLUGIN group_replication SONAME 'group_replication.so';
START GROUP_REPLICATION;

-- Verify membership
SELECT * FROM performance_schema.replication_group_members;
Step 5: Install and Configure MySQL Router
Install MySQL Router on a separate node or client machine:
# Install MySQL Router
sudo apt install mysql-router -y

# Bootstrap Router with the cluster
sudo mysqlrouter --bootstrap [email protected]:3306 --directory /etc/mysqlrouter --user=mysqlrouter --force

# Configure Router as systemd service
sudo tee /etc/systemd/system/mysqlrouter.service << 'EOF'
[Unit]
Description=MySQL Router
After=network.target

[Service]
Type=forking
User=mysqlrouter
Group=mysqlrouter
ExecStart=/usr/bin/mysqlrouter --config=/etc/mysqlrouter/mysqlrouter.conf --user=mysqlrouter
PIDFile=/var/run/mysqlrouter/mysqlrouter.pid

[Install]
WantedBy=multi-user.target
EOF

# Create mysqlrouter user and directories
sudo useradd -r -s /bin/false mysqlrouter
sudo mkdir -p /var/run/mysqlrouter /var/log/mysqlrouter
sudo chown mysqlrouter:mysqlrouter /var/run/mysqlrouter /var/log/mysqlrouter /etc/mysqlrouter

# Start and enable MySQL Router
sudo systemctl daemon-reload
sudo systemctl enable mysqlrouter
sudo systemctl start mysqlrouter
Step 6: Test High Availability and Failover
Test the cluster’s high availability capabilities:
# Connect through MySQL Router (Read/Write port 6446)
mysql -h localhost -P 6446 -u root -p

# Create test database and data
CREATE DATABASE ha_test;
USE ha_test;
CREATE TABLE test_table (id INT PRIMARY KEY AUTO_INCREMENT, data VARCHAR(100), created_at TIMESTAMP DEFAULT CURRENT_TIMESTAMP);
INSERT INTO test_table (data) VALUES ('Test data 1'), ('Test data 2'), ('Test data 3');

# Verify data on all nodes
SELECT * FROM ha_test.test_table;
Simulate a primary node failure:
# Stop MySQL on the primary node
sudo systemctl stop mysql

# Check cluster status from another node
mysql -h 10.0.1.11 -u root -p -e "SELECT * FROM performance_schema.replication_group_members;"

# Verify automatic failover through Router
mysql -h localhost -P 6446 -u root -p -e "INSERT INTO ha_test.test_table (data) VALUES ('After failover');"
Best Practices
Follow these optimization and security best practices:
- Monitor cluster health using
SELECT * FROM performance_schema.replication_group_membersregularly - Implement proper backup strategies with automated encrypted backups using tools like Restic or Kopia
- Use connection pooling at the application level to optimize database connections
- Configure appropriate timeouts for
group_replication_member_expel_timeoutandgroup_replication_unreachable_majority_timeout - Regularly update TLS certificates and rotate replication passwords
- Monitor performance metrics using tools from your observability stack
- Test disaster recovery procedures regularly in non-production environments
Security Warning: Always use strong passwords for replication users and regularly rotate credentials. Implement network-level security using firewalls and VPN connections between nodes.
Conclusion
You’ve successfully deployed a highly available MySQL 8.4 LTS InnoDB Cluster with Group Replication, TLS encryption, and intelligent routing capabilities. This setup provides automatic failover, data consistency, and horizontal scaling for demanding production workloads.
The InnoDB Cluster architecture ensures your database remains available even during node failures, while MySQL Router provides seamless connection management. Compared to traditional master-slave setups, this solution offers superior fault tolerance and automatic recovery.
For enterprise deployments, consider exploring Onidel’s high-performance VPS solutions with NVMe storage, high-availability features, and advanced networking capabilities. Our Singapore VPS instances provide the reliability and performance needed for mission-critical database clusters.
Related Articles
How to Encrypt Your Ubuntu 24.04 VPS with LUKS2 In-Place: Complete Remote SSH Unlock Guide (2025)
ZFS on Ubuntu 24.04 VPS: Complete Installation and Performance Guide with Snapshots and S3 Backups