Deploy High-Availability Cloudflare Tunnel with Multi-Region Failover: Amsterdam and New York VPS Setup Guide (2025)
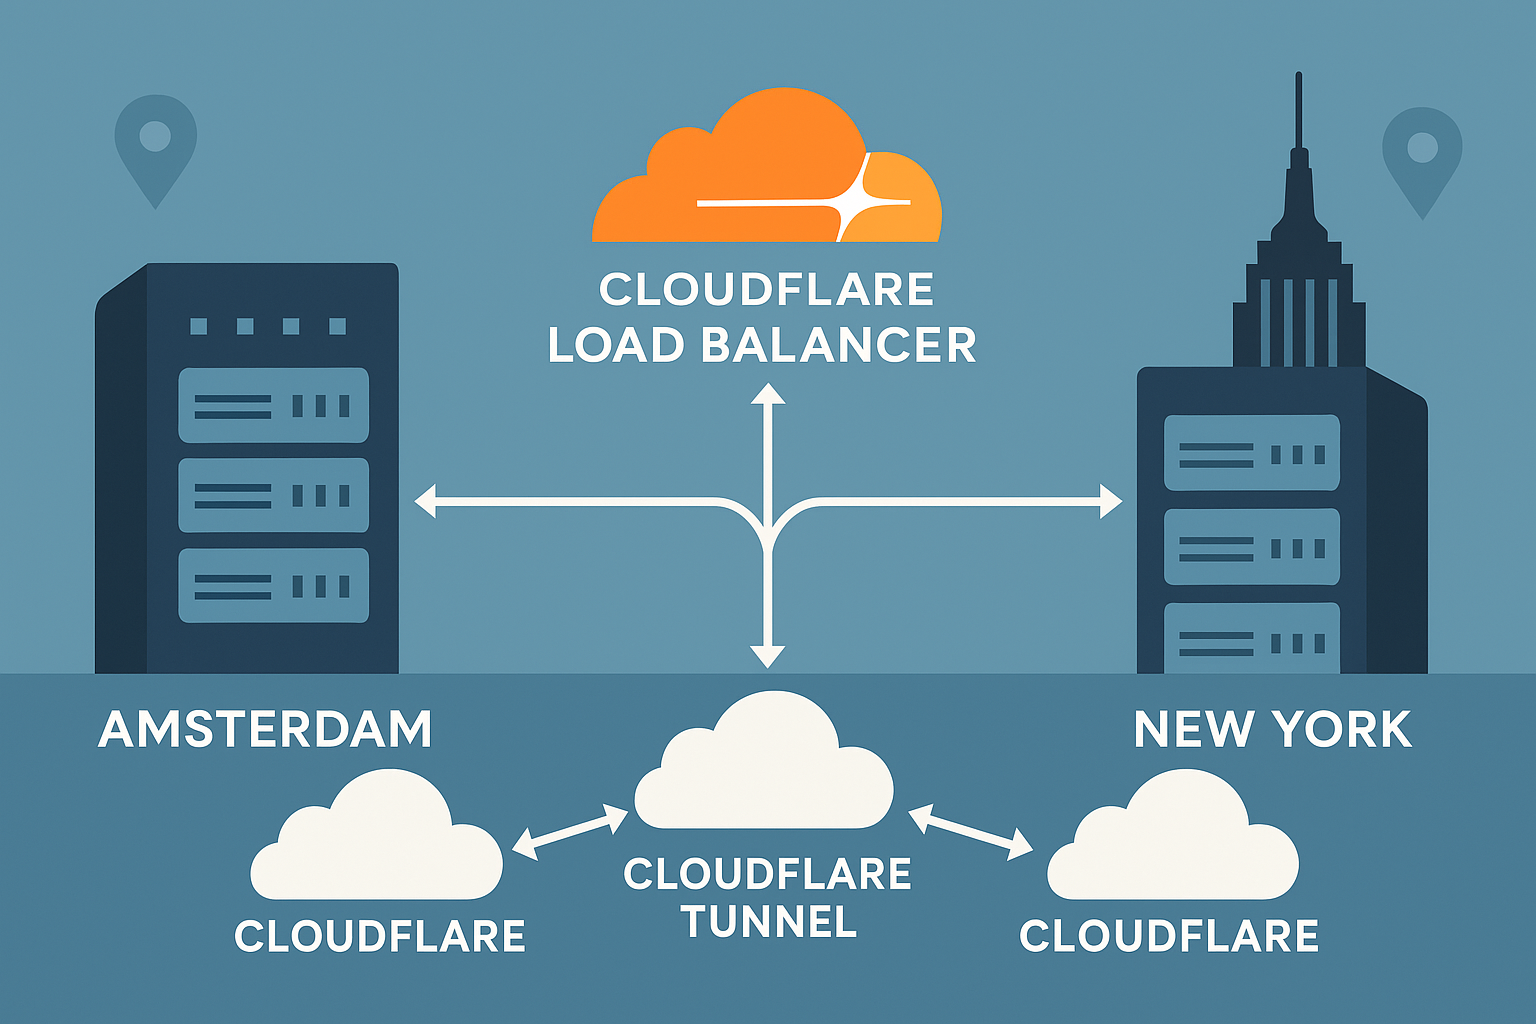
Creating a globally distributed infrastructure with zero-downtime failover is crucial for modern applications. This comprehensive tutorial demonstrates how to deploy a highly available Cloudflare Tunnel (formerly Argo Tunnel) across Amsterdam VPS and New York VPS instances, utilizing Cloudflare’s Load Balancer for intelligent traffic routing and automatic failover.
Why Multi-Region Cloudflare Tunnels Matter
Single points of failure can devastate application availability. By deploying Cloudflare Tunnels across multiple geographic regions, you achieve:
- Geographic redundancy with sub-50ms latency for European and North American users
- Automatic failover through Cloudflare’s global network
- IPv4/IPv6 dual-stack support without complex networking configurations
- Zero-trust security with encrypted tunnels and no exposed ports
This setup leverages Amsterdam’s proximity to European financial markets and New York’s low-latency access to major exchanges, making it ideal for latency-sensitive applications.
Prerequisites
Before beginning this tutorial, ensure you have:
- Two Ubuntu 24.04 LTS VPS instances (minimum 1GB RAM, 1 vCPU each)
- Root or sudo access to both servers
- A Cloudflare account with a domain configured
- Cloudflare Zero Trust access (free tier available)
- Basic familiarity with Linux command line
Performance Tip: We recommend using Onidel VPS in Amsterdam and New York for optimal performance, featuring high-performance EPYC Milan processors and NVMe storage with triple replication.
Step-by-Step Multi-Region Deployment
Step 1: Install Cloudflared on Both VPS Instances
Connect to your Amsterdam VPS first and install the latest cloudflared:
# Download and install cloudflared
wget https://github.com/cloudflare/cloudflared/releases/latest/download/cloudflared-linux-amd64.deb
sudo dpkg -i cloudflared-linux-amd64.deb

# Verify installation
cloudflared --version
Repeat this process on your New York VPS.
Step 2: Authenticate Cloudflared
On your Amsterdam VPS, authenticate with Cloudflare:
# Authenticate (this will open a browser or provide a URL)
cloudflared tunnel login
This creates credentials in ~/.cloudflared/cert.pem. Copy this file to your New York VPS:
# On Amsterdam VPS
scp ~/.cloudflared/cert.pem user@ny-vps-ip:~/.cloudflared/
Step 3: Create Named Tunnels
Create separate tunnels for each region:
# On Amsterdam VPS
cloudflared tunnel create amsterdam-tunnel

# On New York VPS
cloudflared tunnel create newyork-tunnel
Note the tunnel UUIDs generated – you’ll need these for configuration.
Step 4: Configure Tunnel Settings
Create configuration files on both servers. On Amsterdam VPS:
# /etc/cloudflared/config.yml
tunnel: amsterdam-tunnel
credentials-file: /etc/cloudflared/amsterdam-tunnel.json

metrics: 127.0.0.1:8080

ingress:
  - hostname: app.yourdomain.com
    service: http://127.0.0.1:3000
    originRequest:
      httpHostHeader: app.yourdomain.com
  - service: http_status:404
On New York VPS, create similar configuration with the appropriate tunnel name:
# /etc/cloudflared/config.yml
tunnel: newyork-tunnel
credentials-file: /etc/cloudflared/newyork-tunnel.json

metrics: 127.0.0.1:8080

ingress:
  - hostname: app.yourdomain.com
    service: http://127.0.0.1:3000
    originRequest:
      httpHostHeader: app.yourdomain.com
  - service: http_status:404
Step 5: Configure DNS Records
Route DNS to both tunnels:
# On Amsterdam VPS
cloudflared tunnel route dns amsterdam-tunnel app.yourdomain.com

# On New York VPS
cloudflared tunnel route dns newyork-tunnel app.yourdomain.com
Step 6: Setup Cloudflare Load Balancer
In your Cloudflare dashboard, create a Load Balancer:
- Amsterdam Pool: amsterdam-tunnel.yourdomain.com
- New York Pool: newyork-tunnel.yourdomain.com
Step 7: Enable Systemd Services
On both servers, install and enable the tunnel service:
# Install as system service
sudo cloudflared service install

# Enable and start
sudo systemctl enable cloudflared
sudo systemctl start cloudflared

# Verify status
sudo systemctl status cloudflared
Best Practices and Security Considerations
Monitoring and Health Checks
Configure comprehensive monitoring:
# Monitor tunnel metrics
curl http://127.0.0.1:8080/metrics

# Check tunnel status
cloudflared tunnel info amsterdam-tunnel
Security Hardening
- Restrict credentials:
sudo chmod 600 /etc/cloudflared/*.json - Enable firewall: Block all inbound ports except SSH
- Use service accounts: Run tunnels with dedicated users
- Regular updates: Keep cloudflared updated for security patches
Performance Optimization
For optimal performance on your VPS infrastructure:
- Enable HTTP/2: Configured automatically with Cloudflare
- Optimize TCP settings: Consider enabling BBR v3 for improved throughput
- Monitor resource usage: Cloudflare Tunnel typically uses <50MB RAM per connection
Testing Zero-Downtime Failover
Verify your failover setup:
# Test from different geographic locations
curl -H "Host: app.yourdomain.com" https://app.yourdomain.com

# Simulate Amsterdam VPS failure
sudo systemctl stop cloudflared  # On Amsterdam VPS

# Monitor automatic failover to New York
watch -n 1 'curl -s -o /dev/null -w "%{time_total}s - %{remote_ip}\n" https://app.yourdomain.com'
Conclusion
You’ve successfully deployed a highly available Cloudflare Tunnel infrastructure spanning Amsterdam and New York regions. This setup provides:
- Sub-50ms latency for European and North American users
- Automatic failover with health monitoring
- IPv6 support without complex networking
- Zero exposed ports maintaining security
This multi-region architecture scales well with additional regions and integrates seamlessly with other Cloudflare services like CDN optimization. For applications requiring even lower latency, consider exploring optimized VPS configurations for time-sensitive workloads.
Ready to build your global infrastructure? Explore our Amsterdam VPS and New York VPS offerings, featuring high-performance EPYC Milan processors and enterprise-grade NVMe storage for mission-critical deployments.